Thursday, December 30, 2010

PC Hardware News : Gigabyte's new gaming motherboards

Gigabyte G1-Killer microsite


Looks like Gigabyte started to roll out their gaming line after so many years where ASUS keeps rolling the ROG and Sabertooth series for the enthusiasts or hardcore gamers. I can't wait to see what features the G1-Killer have to offer comparing to the competitor's gaming line, hope it's not some fancy bullcrap heat sink add-on and "over 9000+ !!!" VRMs like most gaming motherboards do.


 www.sonoftrinity.blogspot.com

Friday, December 17, 2010

Tron Legacy 3D

Man, I went for this movie today ! IT WAS A BLAST !
Can't wait to play the game Tron Evolution in 3D.


Plus the soundtrack is gonna be in my album list soon....by Daft Punk !!

Wednesday, December 15, 2010

News : AMD Radeon 6950 and 6970 !

Boy oh boy, sure is fast for AMD to release nearly full range of the sixth series of their Radeon HD GPUs.
This time again like the previous 6850 and 6870, tesselation performance have been improved over the 5th gen plus some updated video ports and some overclocking features.

*Image courtesy of Tom's Hardware

Looking at the patern, it looks like we're having like new GPUs on the market every 3 weeks no ?
Personally, seems like AMD almost* playing the same game Nvidia did most of the time, now they'll have to manage the pricing of the previous HD 5th series products and fix a price for the new HD 6th series else it'll make a mess for consumers.

Source :
Tom's Hardware

www.sonoftrinity.blogspot.com

Saturday, December 11, 2010

Software News : 3DMark 11 Released !

Finally, the long awaited benchmark from Futuremark is released !
It comes with a few version like previously, except now the basic edition offers unlimited runs and without expiry and best of all ? it's free ! Anyway, I'll be back once I've got my scores running !

3DMark 11 Free Download


www.sonoftrinity.blogspot.com

Hardware News : Lian-Li PC-X500FX

Lian-Li released a new casing which very much looks like a slimmed version of the Lian-Li PC-X2000F. Well, my thoughts ? this new X500FX still looks as good as the high-end part, as for the price ? not sure about that but expected to somewhere near the X2000F brother's price.


Monday, December 6, 2010

Friday, October 29, 2010

News : AMD Radeon HD6850 and 6870 ! Barts ! Barts ! Barts !

The new AMD Radeon 6 series, Barts core ! Yes, what took me so long to post this ? I'm pretty busy recently. lol
Now I've read through the review webs and let me make up a short conclusion of it.


"Be ready to see more improvements of the 6 series over the 5 series and 5 is gonna get pain in the ass!"

Noticeably, the improvements are better Tessellation performance, better thermal/power management, new Anti-Alias/Anisotropic methods and finally, 3D ! But not to mistaken, its not a direct replacement of the Radeon 5850 and 5870, it can be an cannot...depends on how you see it.
The recent 6850 is more of a direct head-to-head for the Nvidia GTX460 768mb and to fill in the gap of 5770 and 5850. As for the 6870 it's a direct competitor rank to the Nvidia GTX460 1gb and even the GTX470 too !

The most noticeable was the performance on higher resolution and power usage of the two new Radeon cards, sporting 10w~20w lesser to the competitor's solution. Oh boy they did fill in the gap against the GTX460.
At the same time, rumors are around that GTX580 and Radeon 69xx coming soon in a month or two.
Pricing will be a confusion, somewhat priced below the Radeon 5 series brothers..again to fill the gap.

My final words ? Read the reviews !!

Bit-tech Radeon 6870 Review

Bit-tech Radeon 6850 Review

HardwareCanucks Radeon 6870 and 6850 Review

Tom's Hardware Radeon 6870 and 6850 Review

Monday, October 18, 2010

My mini keyboard modding - CoolerMaster Alloy Keyboard

"Refurbishing it or giving it a new color will refresh you view towards it and love it again like before"

Here i go again, something to do with a little free time.But first let me introduce you to my trusty keyboard my friend said it sucks based on their personal point of view, I never got offended anyway, lol.
*Click to enlarge*

This is the CoolerMaster Alloy Keyboard, I liked the old CM stuffs compare to current CM stuffs because nowadays its more like looks instead of substance or content. Anyway, this keyboard has been my trusty mate of input for a few years since its release, 5~6 years ago ? I think so.
Today, being abit free than usual I took around 2 hours to do some fancy stuffs on it. Lets see what i've done, what you see above is the original non-modded brushed alloy surface.

*Click to enlarge*
 
First it was puke green, not sure what green should I call this. This green paint was first used on the old Microsoft 98 P/S2 Keyboard, the last time I used this paint was.....yeah, pretty much nearly as old as the Alloy keyboard, 5 to 6 years maybe ? lol.

*Click to enlarge*

Next was the metalic blue, man I love this the most ! look at the color ! Sparkling blue !

*Click to enlarge*
Here's another angle shot.

*Click to enlarge*
A close shot of the painted material.

Now, lets talk about how I do it, we need some of the below stuffs :
  1. 400 grit sandpaper
  2. 800 grit sandpaper
  3. 1500 grit sandpaper
  4. 2000 grit sandpaper
  5. Some remaining spray paints (my bro's metalic blue and what* what* green was used on this mod)
  6. Clear spray (very important)
  7. good weather (I will explain why)
  8. some ice cold water (same as 6th item reason)
  9. hair dryer (same as 6th item reason)
The sanding on the alloy was done quickly and lightly, instead of heavy sanding compared to the CM Stacker I did previously. The alloy material actually is more easier to get over-sanded, simply put it if i sand it too much it'll lose its shape, lol. From 800 grit to 2k grit and some water.

First, sand the thing from 400 grit and till 800 grit ONLY. I did this just to make it rough enough for the first layer of paint to stick on it. The finer sanding will be done later.

Now the first layer I used was the clear spray instead of the normal colored primer paints, due to the brushed material of the alloy, those color will stuck in bad in case I want to remove it. (in case I changed my mind or got bored with the color, lol)

After the first layer of clear spray, I left it there to dry up under then sun, weather wasn't really good today due to some hazy weather. So I got my girlfriend's hairdryer ready, thanks to her btw.

Once dried, again I went to sand it lightly with 1500 grit and 2000 sandpaper. The surface isn't smooth enough due to instant two layers of paint. Once sanding done fine sanding, the final part was done with a light layer of clear spray. After the fine sanding, the paint will look abit scratched, don't worry unless you sanded it too deep and might need to redo the 2nd layer of color paint. Nothing serious though.

WEATHERMAN

Now, I have said above I will explain why the need of the good weather. Due to the hazy weather here in Malaysia recently without known actual reasons (weather guy said this is largely due to some open burnings), to make sure the paint dry fast enough I used the hair dryer to heat it up and then cool it down with cold water. This might not be the best method to prolong the paint's condition, without the sunny light it wont work good.

Once heated, cool it down with water and wipe it dry with tissue or some lint free cloth. I did this everytime a layer of paint is done. Actually, other than cool water I did try placing it in the freezer, lol. Works the same but overkill and you don't want your freezer smell like aerosol especially the foods.


FINAL WORDS

I bet most of us have some old computer parts or anything non related to computer, being worn out, being old, being....outdated ? Refurbishing it or giving it a new color will refresh you view towards it and love it again like before. Say like you have an old speaker you loved alot or some table so old you find it useful but worn out with old colors, put on your thinking or creativity hat and make some skillful or n00b moves, who knows ? you made something unique out of it. And hey ! practice makes perfect aint it ?
Now you know how it works, I can gladly help more if you have any questions you can email me.

Btw, if you really wonder how many times did I painted the keyboard ? once each, ONCE each, lol. Because I own three of these keyboards. Painted two, one left in vanilla form - unmodded.

www.sonoftrinity.blogspot.com

Friday, October 15, 2010

My case modding update - CM Stacker STC-01

I don't know if any of you guys seen the first generation Coolermaster Stacker before, this case is basically my dream case after so many years even I have looked into various difference cases from ATX to M-ATX or even ITX casings.


The CM Stacker STC-01, the big bad ass cases back in the days when CM Centurion was famous for its aluminum panel designs.  The Stacker, lets call it stacker shall we ? , Its design actually was one of the early designs that sparked the BTX factor for consumer market and also one of designs that created the idea of botom located PSU designs. Whoa boy, there's more to come !


This big baby packs a total of....lemme count, 11 drive bays !! What can you do with 11 drive bays ? well alot of stuffs i say. The 11 drive bays are 5.25" form, and no specific bays are designed for the 3.5" harddrives but WAIT, there's a so called 4-in-3 device included along its content. What does it looks like and what the 4-in-3 device looks like?


This is the 4-in-3 device for mounting HDD drives, it uses 3 x 5.25" bays and converts them into 4 x HDD slots. Neat eh ? at the same time it allows a 120mm fan to be mounted. Imagine 3 of these things mounted to the front bays and you'll get 3 x 120mm fans blowing cool air into the case or vice-versa.

If you notice, the bays above have these tooless clips or attachments that is used for mounting the device or optical drives to the 5.25" bays. They gave shitload of these for the case and with 11 bays, 11 for each sides and it make up 22 total. Madness !

As you can see, the buttons are located on the first bay, and yes baby ! this thing can be adjusted to any available bays. Total modifications !! Packs 6 x USB ports, some audio jack and the firewire port and finally the reset/power button.


The motherboard tray is removeable as well, and jolly hell it takes 15 screws removal to get this thing out, i guess this is what makes the case so damn solid. If you noticed, there is a rectangular hole at the tray and this hole is actually the exhaust/intake of the CoolerMaster obsolete crossflow fan.


Screws, screws, screws, screws and screws, this is what u get with the casing. There's so many of it and i doubt all of them are used.
And finally....WHEEEEELLLSSSS !!! This thing got wheels yo ! Seriously, this is a need because the case itself without internal hardware is 14 Kgs ! and with some stuffs in it say like 2 drives , motherboard, 1 ODD, few rams, heat sinks, fans, and lots of screws, it'll reach more than 17 Kgs. Heck heavy I say.
Now the interesting part !

It sure is my dream case, but when i had the money to buy it ? its already EOL (End of Life). Its considered as a rare case for me, even after 5 years, a new one still costs RM500+. One day while surfing a local forum, i stumbled upon a guy who is selling this rare case at a bargain price. This bargain price however is worth a new low end Coolermaster HAF or something similar. The seller includes everything that comes from the case, screws and everything. Nice and its a deal.
Now here comes the part where i was like WTFNEWYORKSAUCE! (picts by previous owner provided below)

THE ACTUAL CONDITION

I was told that the case had some minor scratches, well its acceptable. Unfortunately I don't have the detailed pictures of the case first condition. Anyway, the case was in bad condition, lots of dust, some stain marks, lots of worn out stickers, lots and lots of rusty parts. It made me sat there for a few hours trying to figure how am I supposed to clean it. The dusts collected are like black cottons, by meaning of black its like the case has grown some hairs in it.


I dismantled all the parts into bits, took it out to the compound and blasted it with water, full blast ! The dirts and dust is so stubborn till I have to use car shampoo to wash it. Took an hour to clean it part by part.
after cleaning the whole case and again I blasted with bla bla bla. Next.

After the wet cleaning, i went to some chemical cleaning with Brasso on the stickers and other obvious parts. The blackness is everywhere but Brasso took care of it. Again, bla bla bla, next.

Now here comes the pain in the ass and elbows and fingers part. I bought dozens of sandpapers and dug out some old paints. I thought of repainting it to a solid color, screw it. Sandpaper first. For almost two days I've spend all my time in the toilet sanding the shit out of the casing side panels. Now the previous owner painted the case without a layer of primer or in layman's term, then under layer paint. The primer is actually recommended when dark colors are used on the case, such as black for example. Black on aluminum is a no go and its a pain in the ass when you wanna remove it.
Before sanding, I bought a can of paint remover and using this can of stuffs without protection on your hands, eyes or feet can cause serious sting or skin cancer on the long run I guess ? Anyway, a tooth brush and half can of paint remover and a girl friend helping me. I've finally removed the black paint and it's still having dark stripes all over the side panels.

Now why the dark stripes ? the original panel is in silver color, which is brushed aluminum. Brushed aluminum have millions or billions of small stripe like gaps, with paints filling it up will be a bad time for someone who plans to remove it.
I went into sanding it, polishing it. Now remember what you have see above. And lets see my result. Notice the Before and After.


I thought of painting it, but heck it looks good just like this guy :


Shit, might as well name it S.T.A.C.K.E.R Mk II. 

Tools used for refurbishing the case ?

  • 20+ sandpapers from 100 grit sandpapers to 2000 grit
  • a can of clear spray
  • a bottle of Brasso polisher
  • a can of paint remover
  • a large amount of water for blasting
  • a few cups of sweet stuffs, Ice-cream soda i think ?
  • a lot of energy for moving the sandpapers
The result ? Priceless.

Now a note about the case performance, as expected to delivered superb cooling performance with only 3 fans excluding those on my CPU and VGA as both of these two are stock coolers. Everything is so damn cool compare to most of the cases I've tested.

Cooling tools :
  • 12cm Delta Brushless (Provided along by previous owner, kick ass high-perf fan)
  • 12cm Enermax Volcano bat shit fan 
  • 80cm Delta brushless i think ?
Future plans ?
  • more HDD
  • more crazy stuffs

Now more pictures:


* first sets of pictures are courtesy of Toms-hardware archives.
*second set is from the seller I bought it from.

Monday, September 13, 2010

PC HARDWARE REVIEW : AMD Phenom II X6 1055T , Gigabyte 880GMA-UD2H , 4 x 2Gb KingstonValueRAM DDR3 1333mhz

INTRODUCTION

First of all, sorry for breaking the promise on posting the reviews back few days ago, lol coz I got too unexpectedly busy. Now straight to the point, i will now present you the AMD Phenom II X6 1055T processor !! and the Gigabyte GA-880GMA-UD2H and the four sticks of 2 Gb Kingston ValueRam DDR3 1333mhz !! AND ? well, a bad news is the Gigabyte GTX460 1Gb GDDR5 have to wait for next time, but soon !


INTRO - AMD Phenom II X6 1055T , 2.8Ghz / 3.3Ghz TC , 9Mb cache

Hell yes, after a long journey and I’ve found this baby. Anyway, here’s some picts and specs of the proc :


AMD Phenom II X6 1055T
2.8Ghz Stock/ 3.3Ghz TC
9 Mb total cache 
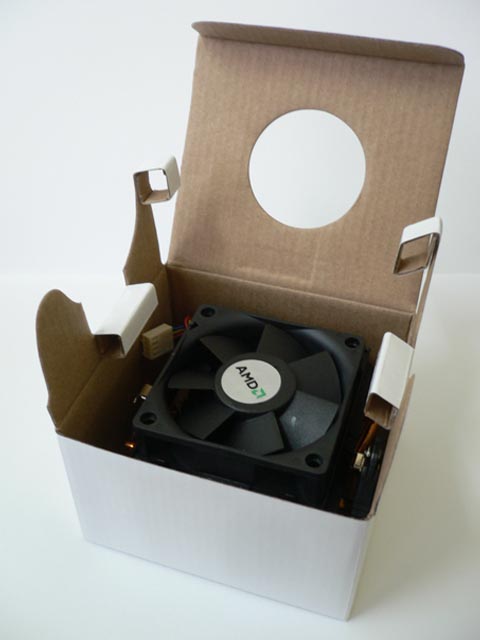
Socket AM3 w/ Heat Sink Fan

Now as for the specs, it consists of 6 physical cores and runs at a default speed of 2.8Ghz each core, with AMD’s TurboCore technology (something similar like Intel’s TurboBoost) it can automatically boost the cores up to 3.3Ghz depending on the usage, and with 9 Mb of cache making it big enough for the 6 cores to play with. Finally, it runs a AM3 socket and friendly enough some rumors saying Bulldozer might be on AM3 or might be unfortunately running on the new server like socket.

As you can see above, there are two different 1055T processors with a 95w and a 125w. A few websites did feature a retail box of the 95w 1055T which I first thought the 95w was released on the OEM market only, seems I was wrong about it. lol.

We further continue to see whats in the box shall we ?

As you notice, the heat-sinks of the AMD PII X4 high end series and the X6 uses a heat-pipe version of sinks and uses a copper+aluminum design for optimized heat transfer and getting rid of the heat faster comparing to the old full aluminum designs. Somehow, the heatsink surface is not smooth enough by my standards lol, looks like I'm gonna lap it sparkle soon when the next full maintenance comes.
The remaining photos of the processor :

INTRO - Gigabyte 880GMA-UD2H , AMD 880G Chipset, DDR3, SerialATA 6.0Gbps, USB 3.0


It took me awhile to search for the right board for the right purpose, as usual I'm into small and powerful desktops that doesn't take much space but packs a hell load of punch for intensive resource usage.
Behold ! So far the best m-ATX board for AMD by Gigabyte ! (Personally based on my views, lol).

 The package contains the usual stuffs, motherboard (for damn sure it must be there !) , the manuals, drivers, cables, back I/O plates and finally the stickers ! stickers ! stickers ! Surprisingly, the Dolby Digital stickers are given as well due to the Dolby capable sound chip mumbo-grumbo.Now lets take a look on the board itself :

By default, there's a large USB 3.0 sticker on top of the PCIEx16 slots, once removed you'll see two PCIE x16 side by side, the first slot from the top is a full 16 lanes running at PCIE v2.0 and the second slot uses a x4 lanes PCIE v2.0, which equals to a x8 PCIE v1.0/1.1. Notice the slots are placed next to each other instead of the usual gap where CrossFireX/SLi systems supposed to be, in order to have two graphics card, the main card must be a single slot card which limits to the current single slot PowerColor HD5770  1Gb GDDR5 or having two of the single slot cards as CrossFireX settings.
Further on you can see the SerialATA 6Gbps ports, internal USB 3.0 ports and the AMD SB850 south bridge.
So far, the design of the board satisfy my needs, especially the SATA ports where usually Gigabyte places them directly across the main PCIE slots, except this time only the 5th SATA port is being blocked by a full 10 inch sized card and 4 3 is more than enough for me.


The above shows the NEC USB 3.0 chip used for the newest USB connections.
If you expand the picture, you'll notice the second slot have a part of the slot without contact pins due to the x4 PCIE specifications.
The back of the board as usual, instead of chrome CPU backplate, it uses a black CPU backplate.
The I/O ports of the motherboard.

At the back of the board you get some old school superior PS/2 ports for keyboard or mouse, 4 x standard USB 2.0 ports, VGA/DVI/HDMI that feeds directly from the onboard AMD HD4250 graphics chipset, 1 x Gigabit connection, 2 x USB 3.0 , and 7.1 Realtek HD audio.

INTRO - KINGSTON ValueRAM DDR3 1333Mhz 2Gb x 4


Now here's some innocent ValueRams from Kingston, there's four sticks of these using Elpida chips and for the sake of saving some space, two of these was pictured. Each of these rams runs on a DDR3 1333mhz speed @ cas latency of 9. Specifically, these rams was named as PC10600...which is kinda confusing since the numbers are reaching 10k + and i doubt nowadays people still often naming them by the PC prefix. Anyway, lets call them DDR3 1333Mhz (Double-Data Rate 3 , 1333 Mega Hertz) .

Nothing much to say in intro anymore, lets go into the benchmarks and scores !

TEST BENCH

I've been thinking after sometime to refine the benchmarking tools i use for the next few comming reviews in case. 

As for CPU we have :

Softwares and applications are subjected to change from time to time due to updates and usage or purposes. 64-bit softwares will be used when available, else the chart will show whether it's 32-Bit or 64-Bit

  • HardwareMonitor is used to monitor the temperature of the system and same goes to the voltage of the rails.This application can be downloaded from www.cpuid.com. 
  • In graphics benchmark, we have the synthetic benchmarks by 3DMark06 and Vantage, both settings are based on the preset of the benchmark profile available in 3DMarks. The settings under 3DMark06 is using the default settings and as for the 3DMark Vantage we'll be using the HIGH bench profile.
  • Crysis will be the demo version of the game with the build in benchmark, during CPU benchmarks the overall settings are set to medium without Anti-Alias @ 1024x768 to keep the CPU busy.
  • PCWizard consists of the basic bench of the power of the CPU, from processing power to bandwidth and memory performance.
  • SISoftware Sandra is used as a pure CPU benchmarking tool.
  • Cinebench is used to measure the performance for evaluating the 3D performance of the CPU and GPU. The R10 is the older version while the R11.5 is the newer version.
Multitasking test will not be done as its a varied results with no real world performance results.

SYSTEM SETTINGS

AMD Phenom II X6 1055T 2.8Ghz on stock with 3.3Ghz on TurboCore enabled. (OC @ 3.64Ghz )
Gigabyte 880GMA-UD2H 
Kingston ValueRam 4 x 2Gb DDR3 1333mhz (OC @ 1732mhz)
Gigabyte GTX460 1Gb GDDR5 TwinFlow
Seagate 500Gb SATA 3.0Gbps (Main OS)
WD 1Tb SATA 3.0Gbps (Storage)
LG dual-layer DVD-RW SATA
Seasonic M12 620w Modular PSU
Silverstone SG03 SFF casing
23 inch display with native 1920x1080 resolution @ 60hz
MS Windows 7 - build 7600

BENCHMARKING RESULTS

To make things simple and direct, here's the result :


Well, since I have nothing close to compare but you can scroll though the previous results of my old CPU benchmarks for comparisons, as for now I made a stock default vs overclocked results. 

As you can see, an overclock from the normal TurboCore 3.3Ghz speed to the 3.64Ghz there's a noticeable performance bump especially in graphics and multi-processor applications.

First of all, the first thing is I had doubts on this processor's temperature but it turns out cool and stable indeed ! Good news is it runs very very cool at stock underclocked speed, when there are no intensive applications running then it'll will automatically under clock the six cores to 800Mhz thus making it cool. Even with full 3.3ghz under heavy stress, the CPU still tops around 50c~53c. The bad news is the stock processor heat sink fan is making too much roaring noise from the super fast spinning at 6 thousand RPMs (yes, 6k rpm !).

As for synthetic graphics benchmark,  the default marks generated was 5174 3Dmarks06 on CPU after overclocked, it poped up to 6295 with a 1k+ increment in marks. In Vantage, default clock scored 14k for CPU score while overclocked scored a kick ass 18k with 4k increment.

In Crysis CPU benchmark, it scored a minimum 24.98 FPS and 79.06 FPS on maximum FPS, once overclocked the minimum frame-rate boosted to 49.51 FPS and 90 FPS for maximum.

In PCWizard, the most noteable jumps between overclocked was the Processor Benchmark scores and the Memory Bandwidth  due to the increased clock speed of 1732Mhz on the DDR3 rams.

SISofrware Sandra 2010 SP2 showed us how much expected processing power especially on the calculation and cryptography strength. As you can notice the difference between the stock and overclocked, its a healthy jump. 

Cinebench R10 showed the need of having multi-threaded processors, the stock generated a 16k while the overclocked showed 19k with 3k increment in scores. Cinebench R11.5 with the new updated score system, the stock cpu generated 41.60 FPS on OpenGL renderer and 4.98 pts for CPU scores, on the overclocked conterpart it scored 43.44 frames and 6.35 pts. The OpenGL score didn't made a big jump due to the reason it's stressing the GPU more than the CPU. 

CONCLUSION

In conclusion, this set of stuffs costs a quarter less cheaper than the equally powefull Intel setup especially the Intel i5 750/760/860. Although its slower in synthetic benchmarks, in games they're equally fast and most of all AMD costs cheaper and with abit of overclocking you get the bang for your bucks.

On the AMD Phenom II X6 1055T, the processor is near perfect except for the HSF that made too much noise during full load. The heat generated is surprisingly cooling compare to the previous X4 , this might be due to the fast and loud HSF and underclocking functions and what's more ? it's running in a cramped SFF case that have a little close to not much space for cool air. Overrall , it kicked ass on price/performance but on the note of finding one is kinda hard during the first few months as the demand for the 1055T is mad.

As for the motherboard, a solid performer with tons of features, from the new USB 3.0 and SATA 6.0, Gigabyte included a function where the USB 3.0 can charge an iPhone even when the PC is turned off. I went to the gigabyte overclocking workshop sometime ago and the board they used was the Intel platform Gigabyte H55M and to me this board is unofficially its AMD counterpart.

The rams, man they kick ass ! a value ram with a bucket of overclockable performance, from 1333Mhz to and unexpected 1732Mhz , four sticks in dual channel ! By the way, i expect it'll be able to go higher but thats another time since the purpose of this review is focused on the CPU and the Motherboard.

Well, to sum of the price and you get a six core action for your heavy multi-tasking (I doubt anyone's brain can multi-task 15 apps as much as a six core can handle) , with burning softwares running, movies playing, P2P and converting movies at the same time, the 1055T will be able to handle it.

Guess what ? the expected whole system costs around 2.5 for the desktop CPU only without monitor ! (with a monitor around 22inch you'll get a near 3k system that is able to last a few years until upgrades !)

As a final note, if any of you guys wanna build a similar system and thinking whether if you'll need a hex core or a quad core , I'd say on a budget note get the quad and its as fast as the hex in gaming unless you'll want to do alot of intensive 3D rendering and converting or editing lots of movies, 6 cores it the way to go !.

Also be sure to check out the previous reviews of the other website links on the left of my blog for other comparisons !!